
Deadwood is a magazine theme primed for publishers who want to multiple entry points to their content in a clean and clear fashion. Deadwood can transform your tubular blog into a real website.
Deadwood comes packaged with:
- Ten rotating custom header images
- AJAX-enabled sidebar on the homepage
- Multiple entry points to your posts on the homepage
- Two fully widgetized sidebars
- A fully widgetized bottombar
- Authors Archive page
- Two page templates: One with sidebars and another without
- S.E.O. optimized
- Valid HTML and CSS
- Utilizes the Blueprint CSS framework
Installation
- Unzip the downloaded file
- Upload the entire “Deadwood″ folder to your “/wp-content/themes/” folder
- Log in into your WordPress control panel
- Click the Presentation tab
- Select the “Deadwood” screenshot
CONFIGURATION
- GETTING STARTED: To get Deadwood off and running, you will need a minimum of 5 categories to populate the homepage. The main section on this page is the latest article posted in all categories. The top right section shows the next three latest posts. The section below the main section shows the previous five entry excerpts, offset by four. The bottom five section pulls the latest posts in categories 3, 4, 5, 6, 7. You will want to change these category number id’s to the categories you want to display, which is detailed below.
- YOUR CATEGORIES: In the “home.php” you will find a series of query_posts functions which refer to specific category ID numbers from my database.
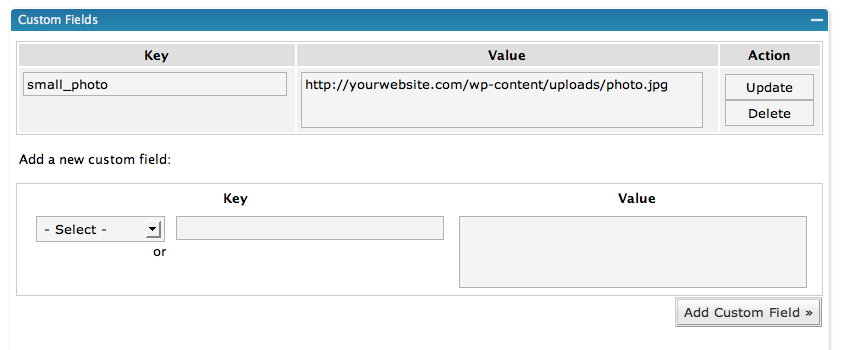
You will need to change the category numbers to reflect the ID numbers of the categories that you want to display on your homepage. Category numbers can be found in your control panel under Manage->Categories. There are a total of 5 spots in the home.php file to change to reflect the post categories that you want to display on the main page. - YOUR PHOTOS: If you want your website to resemble that of the Deadwood theme demo site, you will need one small photo for each blog post. Small photos should be cropped to 150px wide by 100px tall. Upload the image to the web and copy the URL to the photo. Within WordPress’ Write Post page, scroll down towards the bottom and click on the Custom Fields section. Add a key called “small_photo” and then paste the link to the small photo into the key value field. View a screenshot of the custom fields used for Deadwood. Make sure your custom field values and keys match those in the screen shot above (but change the key value to the exact url to your images.) Custom fields are one of the most overlooked, yet powerful, tools in WordPress. Read more about using custom fields. Photos posted within each entry’s post body should not exceed 350px wide, otherwise, you will make your homepage layout look icky.
- YOUR AUTHORS PAGE: Berlin comes packaged with an author archive (authors.php), which will display some author specific info pulled from the Users page in your WordPress installation. In order for the author’s image to show up, you’ll need to place a jpg of the author titled by the author’s last name in the wp-content/themes/deadwood/images/authors/ folder. For instance, mine is Allender.jpg, sized at 75px X 75px. Here is an example author page.
- STYLES.CSS: Unlike most WordPress themes which plug all the css in one file called styles.css, Berlin utilizes the Blueprint CSS framework to help separate positioning, typography, forms and what I’ll refer to as custom or Deadwood specific styles. To edit all custom Deadwood specific styles, you’ll need to edit the style.css file located in your wp/wp-content/themes/gridline/ directory.
- BEST PRACTICES: It is best to keep your excerpt to one a one line description overview of your post. Having too much written in the excerpt field can bloat the homepage with text.
Credits
Deadwood utilizes the Blueprint CSS framework to help streamline design and development. Most major websites use some form of css framework to allow for rapid, consistent development and design. Take the Blueprint 101 course to learn about all the possibilities.