


Have you noticed ads that pop up in your Facebook featuring websites you recently visited? Those ads are a part of a remarketing campaign, created by a company, to get you back to their website.
They knew you visited because they used a Facebook remarketing pixel on their website.
The non-visible pixel code serves a browser cookie that talks to Facebook when the user logs in. If the cookie applies to a running ad on Facebook then the ad is served to the user.
Below I’ll show you how to set up your own Facebook pixel on WordPress.
Why Your WordPress Site Should Use Facebook Remarketing
Facebook lets you promote your business in a number of ways
- Promoting individual posts
- Promoting call-to-action buttons
- Promoting a website
- Creating specific ads to drive website clicks or Facebook page likes
With each type of promotion you can customize the audience you target with a wide range of options such as geographics, demographics, interests and more. Even with a customized audience you’re still targeting a pretty broad spectrum of people who might not necessarily be interested in your offer.
That can lead to costly, wasted clicks from people who aren’t ready to opt-in or buy from you.
A remarketing pixel helps you narrow your audience to get more relevant clicks from people who have already engaged with your brand.
A comScore study has previously shown that retargeting is one of the most effective ad targeting methods, providing more reach and conversion lift than any other tested method.
Let’s dig in to how you can set up your own remarketing pixel and install it on your WordPress site to see the same benefits.
How to Create and Install Your Facebook Remarketing Pixel
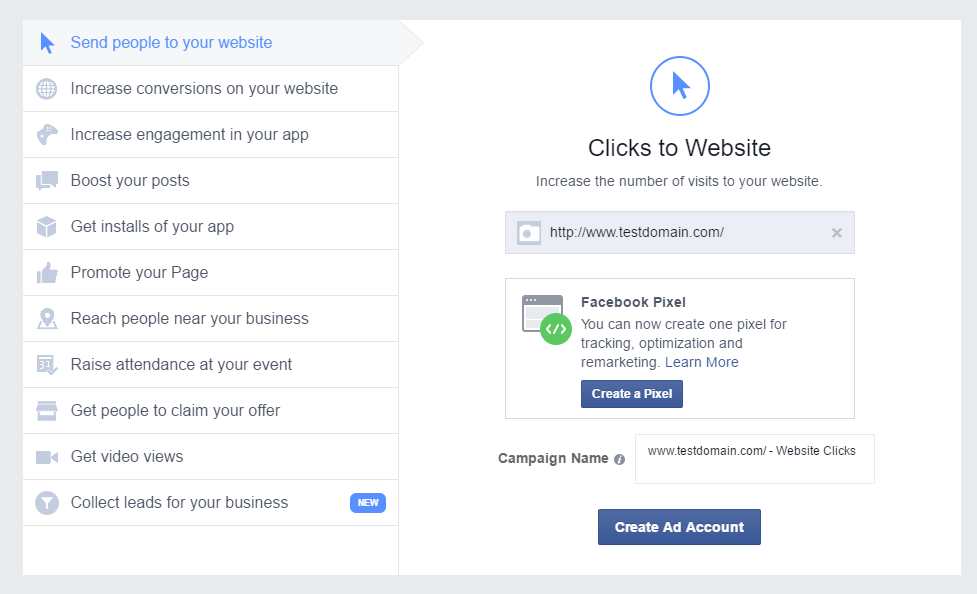
First, log in to your Facebook account. Click the inverted triangle and select “create ads” from the menu to open the Facebook ad center. Your first step is to choose from one of the campaign objectives. For the purpose of this, I’ll select “Send people to your website”
After typing in your URL you’ll be prompted to “create a pixel”

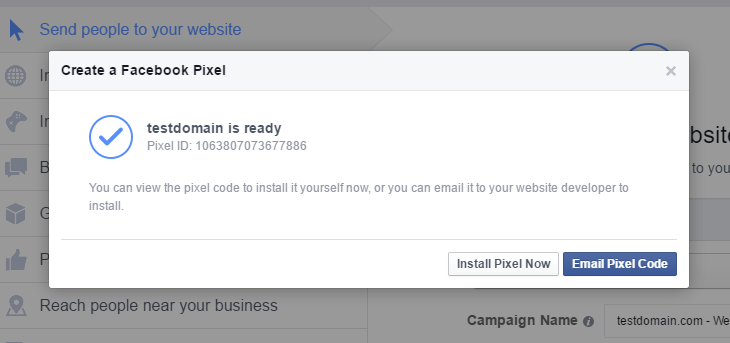
In the following popup enter a name for your pixel (your product or brand) then click “Create Pixel”.


Here you’ll be given a prompt to “install pixel now” or “email pixel code”. If you work with someone who manages your WordPress site you can email the code to them for install.

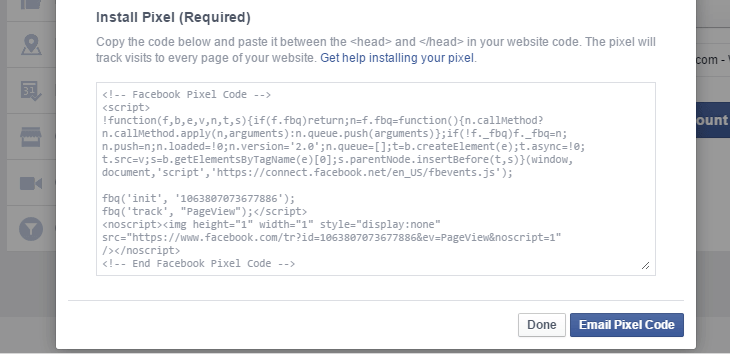
If you choose “Install Pixel Now” Facebook will show you the Pixel code that you need to install on your WordPress site.

Installing your Facebook Pixel in WordPress
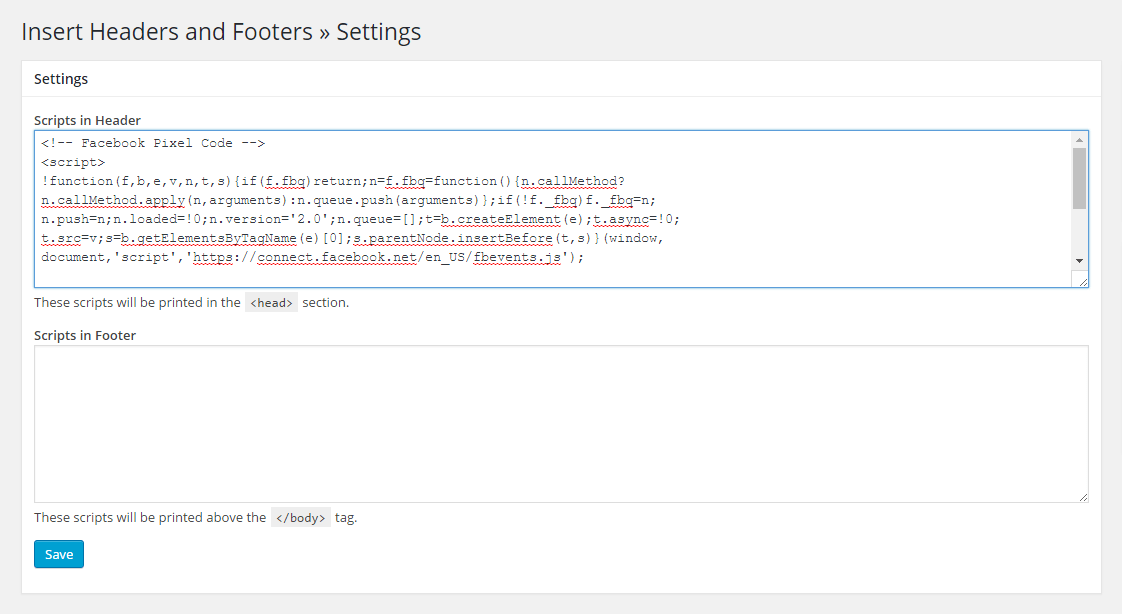
You’ll need to add the Pixel code into the <head> section of your WordPress site. How you do this can vary depending on the theme you have installed. If your theme doesn’t provide an option to edit the <head> info then the best bet is to add a quick plugin, like the Insert Headers and Footers plugin.
After you install and activate the plugin, you need to go to Settings » Insert Headers and Footers page in your WordPress dashboard. Paste in your pixel code to the “Scripts in Header” section and click “save”. That’s it, your pixel is now installed on your WordPress website!

How to Create Custom Audiences With Your Facebook Pixel
Now that you have your pixel installed the next step is to create a custom audience for your remarketing campaign.
A custom audience lets you target people you identify or already know, like with your Facebook pixel. You can also customize audiences to target people who like your page or users who are on a mail list you own.
To set up your audience visit the Facebook Ads Manager (click the same inverted triangle at the top right after you log into Facebook and choose the ad manager)
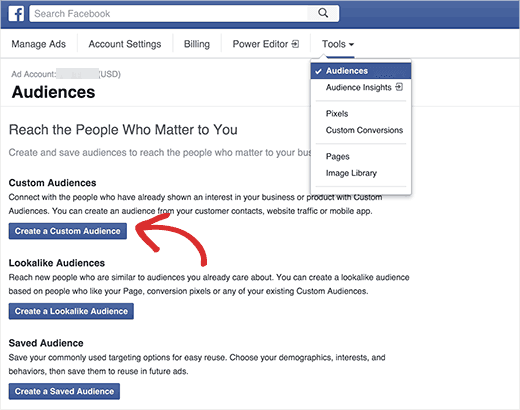

- Click “Tools”
- From the “Tools” menu, click “audiences”
- Click “Create a Custom Audience”
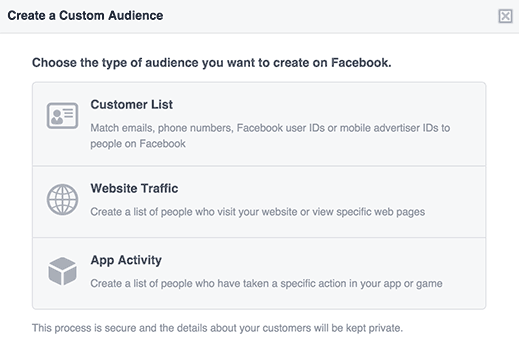
This brings up a popup where you choose the audience you want to target. If you choose “website traffic” you’ll be able to utilize the remarketing pixel.

After selecting the pixel you can further customize the audience by segmenting your website visitors if you wish.
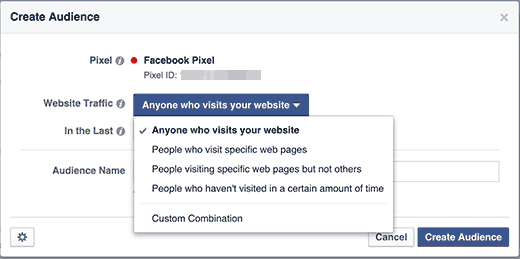

You’ll also select the duration in number of days and provide a name for this custom audience so it’s easy to identify when you create ads. Once completed click on “Create Audience”. You can repeat this process to create as many custom audiences as you like.
Now that your first custom audience in completed you can begin creating Facebook ads and promoting posts using this audience as a target, and your ads will display specifically to people who have visited your website.
Need help creating Facebook ads? Check out this great tutorial from HubSpot.
Conclusion
Paying for display ads on search networks like Google can be expensive and the targeting is imperfect. You can increase revenue and reduce ad spend costs by targeting people who have already engaged with your brand with just a few simple steps
- Create a Facebook remarketing pixel
- Install the Pixel code into the <head> code of your WordPress site
- Create a custom audience that uses your remarketing pixel
- Create your first ad using your new custom audience
Have you had more success with Facebook ads over traditional paid search ads? Tell us about your experience in the comments below: