[protect][/protect]
Our themes use WordPress’s custom menus option to create the menus on your site. Some of our themes offer multiple menu areas.
To add a menu to your site:
- In your WordPress Dashboard, go to Appearance > Menus.
- Create a new menu item by clicking the + tab.
- Select the pages you want to display in your menu and click the Add to Menu button. If you do not see the type of page (category, tag, portfolio, gallery, etc) you want to display, click the Screen Options link at the top of the page and make sure the page type is checked.
- Once you have set your menu as you want it, click the Save Menu button.
- Then, assign that menu to your desired theme location to ensure your menu appears where you want it and click Save.

If you wish to add menu items in a dropdown, you can also set this from your menus screen. To create a dropdown:
- Ensure that the menu item(s) that are to be in the dropdown are directly below the parent menu item on your menu.
- Click on each of these menu items and drag it slightly to the right until you see the dashed lines move as well.
- Once your menu is set the way you want it, click the Save Menu button to save your changes.
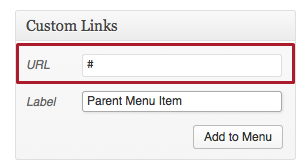
To create a parent menu item that does not link to another page on your site, but still activates the dropdown menu, create a Custom Link. In the URL area, replace everything with a # symbol. In the label, enter your menu name. Add this link to your menu. If you use this menu item as your parent menu item, the dropdown will appear when you click it, without taking the user away from the page.