What is Sell Media?
Sell Media is a free WordPress plugin that allows anyone to sell photos, prints or any other digital media directly from your website. The following documentation will help get you rolling so you can start selling your work online.
Getting Involved
Sell Media is an open-source project. Feedback and collaboration are highly encouraged!
- Roadmap – Follow along on our public roadmap on Trello.
- Bugs – Find a bug? Report it on our GitHub issue tracker.
- Feature Requests – Have a feature request? Email it to us .
- Translations – Translate the plugin to new languages and email us the translation file.
Requirements
- You must have a website. Need one? Get a website.
- You must have WordPress installed on your website.
- You must run your website on an Apache server. You most likely do.
- You must have the GD Image Library installed on your server. You most likely do. If not, ask your web host to install it.
- You must have PHP Sessions configured on your server. You most likely do. If not, ask your web host to install it.
- You must have a PayPal account to accept online payments. You can also use Stripe.
- Important! Starting June 2017 Paypal will require a SSL certificate.
Installation
Sell Media installs just like a normal WordPress plugin:
- Go to Plugins > Add New.
- Under Search, type in “Sell Media”
- Find the Sell Media plugin by Graph Paper Press.
- Click Install Now to install Sell Media.
- Click Activate Plugin to activate it.
Configuration
After you have activated the plugin, you’ll need to do a couple things before you’re able to start selling:
- Visit Sell Media -> Settings and configure your selling preferences.
- Insert the required shortcodes onto your preferred pages.
- Complete the 3 required steps to integrate PayPal with your website.
- Upload your first item to sell on the Sell Media -> Add New page.
Settings
The Sell Media -> Settings page has detailed instructions below each option that quite is self-explanatory. Here is how it looks:
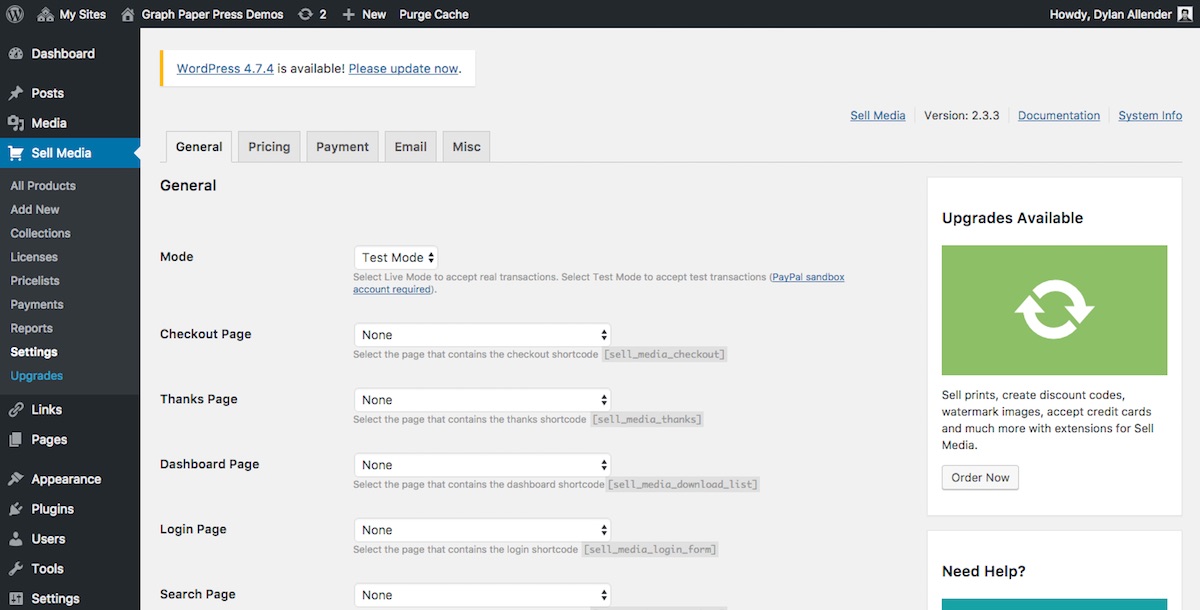
PayPal
Visit the Sell Media -> Settings -> Payment page in WordPress and add your PayPal Client IDs and Client Secret Keys. You are now ready to receive PayPal payments.

If you enable Test Mode (Sell Media -> Settings -> General -> Mode) then you must set your PayPal Test Client ID and PayPal Test Client Secret Key.
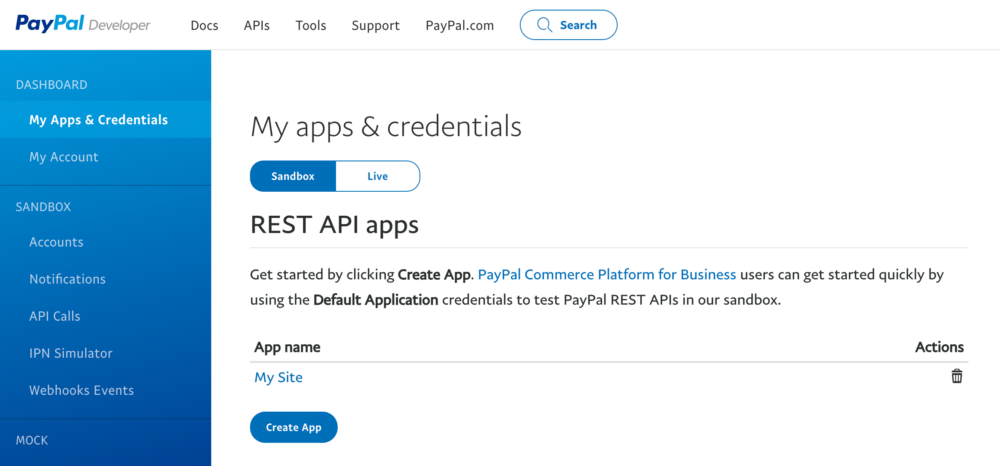
Getting PayPal Client ID and Secret Key
- Visit PayPal Developer site and Login.
- On your dashboard, you should see My apps & Credentials on the right.

- Choose which one of the tabs on the top, Sandbox or Live, accounts you want to use. You can choose Sandbox to test first and then create Live when you make the site live.
- Click the Create App button.
- Once you create the app giving proper name, you should receive the Client ID and Secret.
PayPal Problems
Scenario #1 – Payments Recorded as $0 in Sell Media
If you are receiving empty payments with a price of $0, you have an invalid PayPal setting. You need to set PayPal’s IPN Message Format option to “UTF-8” in PayPal. You can do this by following these steps:
- Log into your PayPal account
- Go to your profile
- Look for the “PayPal button language encoding” section under the My selling tools
- Make sure your website language is set to the correct language
- Click the more options button
- Make sure encoding is set to UTF-8
- Then save settings
- Confirm it’s working by trying another purchase
Scenario #2 – No Payments Recorded in Sell Media
If payments aren’t being recorded at all in Sell Media after payment at PayPal, check these possible problems:
- Thanks Page – Make sure you have created your Thanks page and that it has the following shortcode:
<code>[sell_media_thanks]</code>. - Missing PHP Dependencies – You don’t have the required PHP cURL extension installed on your server. This is how PayPal/Stripe talk back to your website. Ask your web host to install if it’s not installed.
- PayPal Sandbox Confusion – You are incorrectly testing PayPal Sandbox. Both the Buyer and Seller accounts have to be PayPal Sandbox accounts. You cannot mix a REAL PayPal account with a TEST PayPal Sandbox account. It won’t work.
- Firewall – Your web host has a firewall that is blocking incoming pings from PayPal or Stripe. We’ve seen this happen once before with European servers (Germany). They blocked all incoming pings (IPN notifications) that didn’t have a User-Agent defined. PayPal uses IP ranges 66.211.. and 173.0.. and visit the IPN URL with NO User-Agent. Some web hosting companies have their servers set up to block incoming pings when the User-Agent is not explicitly set (as is the case with PayPal’s IPN). In this case, you’ll want to modify your .htaccess file to override user-agent blocking with these address ranges.
- Server Errors – You have a server misconfiguration that is preventing PayPal from receiving the required status code 200. Check your PayPal IPN History to see what the status codes are to help troubleshoot.
- Auto-Return – If all else fails, log into PayPal and change your PayPal Settings to enable Auto-Return and Payment Data Transfer. Set the Return URL to your Thank You page. Some foreign PayPal users have had to enable these in order for transactions to be recorded in Sell Media.
Pricing
All products can be assigned different prices by using the Pricing feature in Sell Media. To add a new Pricing, visit the Sell Media -> Pricing page. Here is how the Pricing feature looks to site owners:
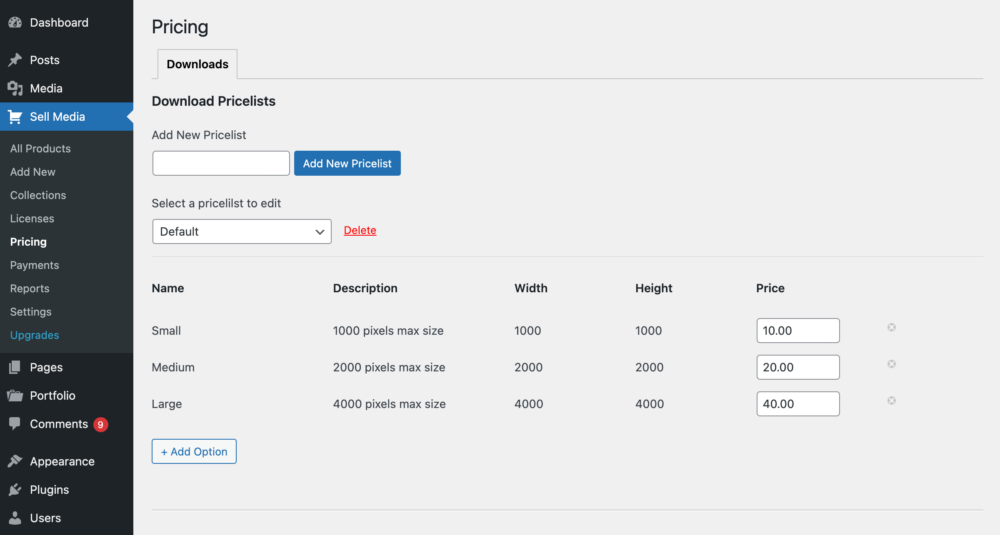
Think of price lists like this:
You shoot photographs for a client or customer and you decide to create a special price list for all the photos that you shot. You could create a price list for this. Example:
Pricelist 1 (Cheap)
- 1000 x 1000 px image, $10
- 2000 x 2000 px image, $20
- 3000 x 3000 px image, $30
Pricelist 2 (Expensive)
- 1000 x 1000 px image, $100
- 2000 x 2000 px image, $200
- 3000 x 3000 px image, $300
Pricelists allow you to create and assign different price options to different photographs. Each option within the Pricelist you create becomes available to your buyers to purchase, so always make sure that the image you’re selling is big enough to be sold at the sizes you specify within your Pricelists.
Licenses
The Licenses feature in Sell Media allows store owners to add and assign usage licenses to products sold. Buyers must select their appropriate usage license on the cart when purchasing the product.
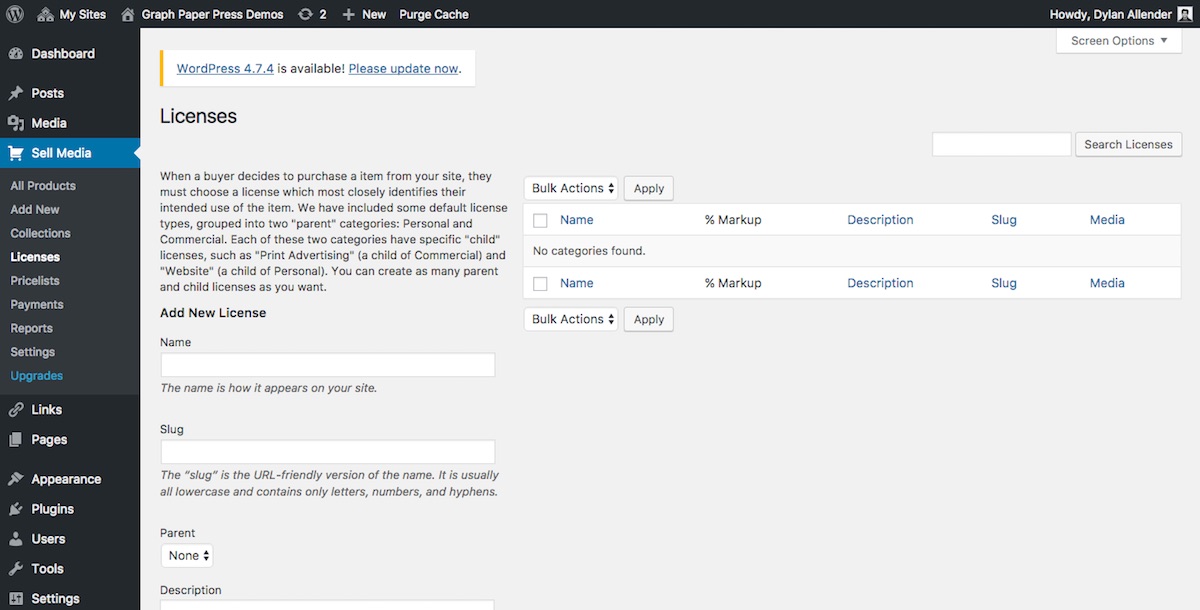
For example, if you’re a photographer, you might want to increase the price of your images if the buyers intended use is for commercial purposes. Create a new license on the Sell Media -> Licenses page, describe the license and assign markup to to the license. Then, add or edit a product and assign that license as an option for your buyers. You can create an unlimited number of licenses.
Keywords & IPTC
Sell Media copies the following IPTC data from all image uploads:
- Keywords
- Creator
- City
- State
This IPTC data is saved alongside your images in Sell Media. Archive pages are automatically created for each Keyword, Creator, City and State so that, for instance, a buyer could view all images with the Keyword “bikes” or all images shot in, say, New York.
EXIF data (shutter speed, ISO, aperture, etc) can also be displayed alongside single images by adding the EXIF widget to the Sell Media Single Item Sidebar widget area.
Adding Your First Product
When you are ready to add your first product, visit the Sell Media -> Add New page. The page looks like this:
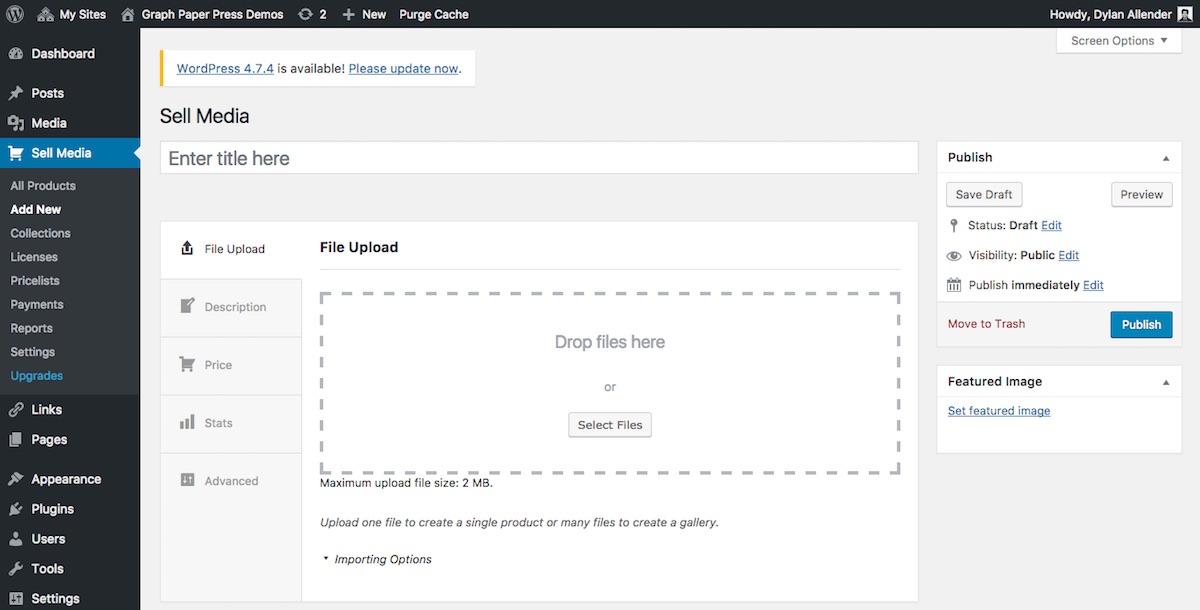
- Give you product a title.
- Upload the files you want to sell. You can upload one file or many files. If you upload many files, they will display like a gallery and the price you define below will be for each item in the gallery.
- Give the product a custom price (it defaults to the default price you created on your Sell Media -> Settings page).
- Optionally assign a Price Group. If you only want to sell the originally uploaded file, leave the Price Group select box set to “Select a Price Group.”
- Optionally write about the product in the main text area below the product details section.
- Optionally assign the product to a Collection (right hand column).
- Optionally assign Licenses to the product.
- Click Save and you’re done!
Adding Galleries
Sometimes you might have 10 or 20 or 30 photos that share the same attributes (price, license, etc). Doing this is incredibly simple: Just upload more than one file. If you upload multiple files, the page will display like a gallery and the price you define below will be for each item in the gallery.
Adding Videos, PDF’s & Other Media
If you plan on selling videos, pdf’s or other non-image files, be sure you:
- Don’t select a Price Group. That only applies to images.
- Upload images or embed video trailer in the main text area below the product details section.
- Add a Featured Image. This image will be shown on archive pages and on the cart.
Bulk Uploading
Any folders that you place inside the wp-content/uploads/sell_media/import/ folder will be listed in the select dropdown box shown in the Bulk Uploading below.
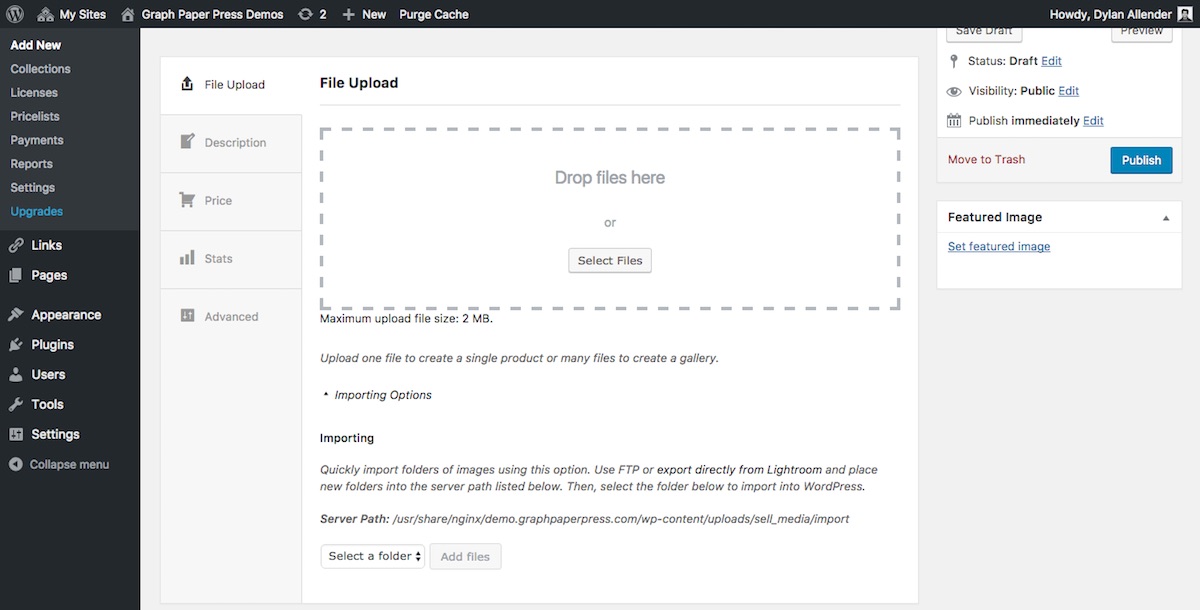
Select the folder containing the images (JPG only, sRGB mode only) that you want to add and click Add Files. Please note: Bulk importing can be a server-intensive process depending on the quantity and size of files that you’re importing. The capability of this feature is dependent on the performance of your server. Upload in small batches to ensure all items uploaded are added correctly.
Most image editing software (Lightroom, Aperture, etc) have plugins available for FTPing images to a server. Use these approaches for placing your gallery folders on your server so you can Bulk Upload into Sell Media.
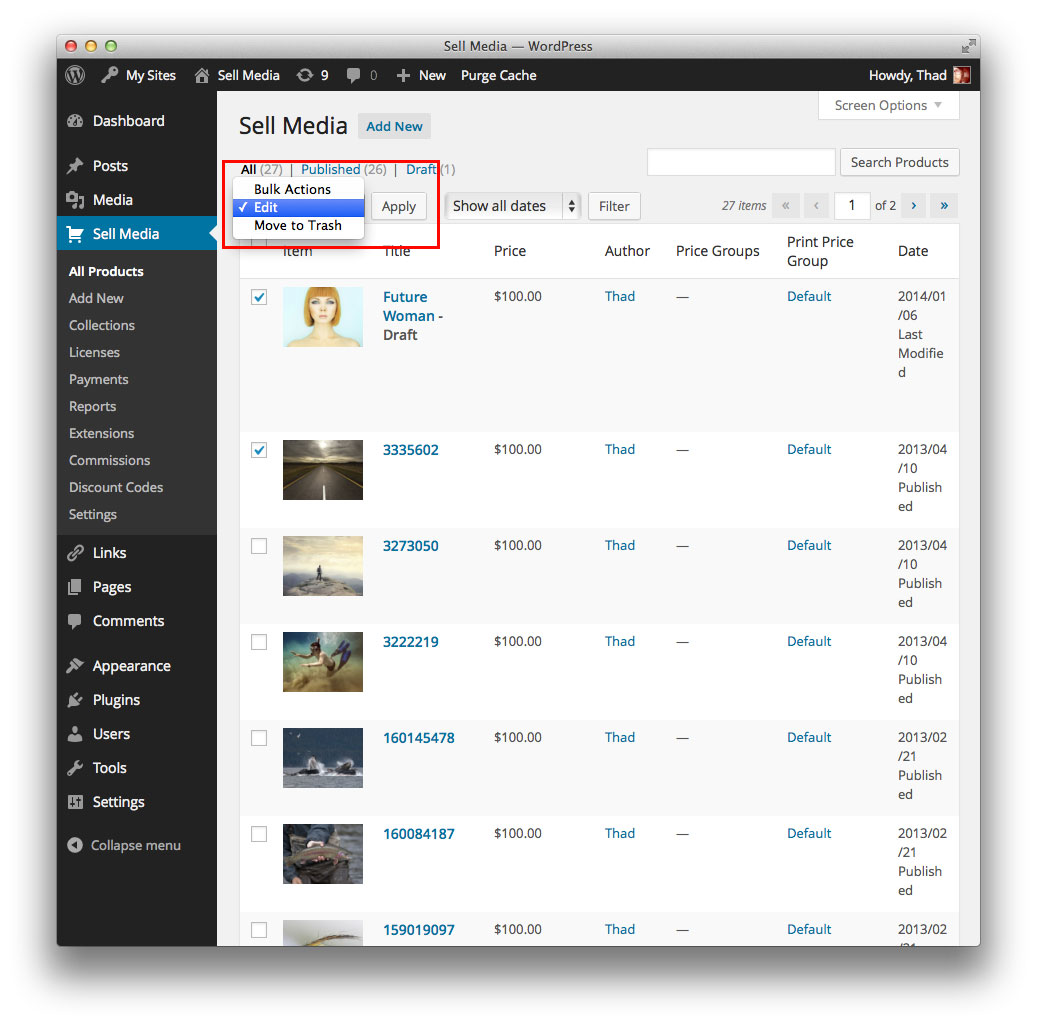
Bulk Editing
You can edit many products at once using the Bulk Editing feature in WordPress:
- Visit the Sell Media -> All Products page.
- Check the box next to each item you want to edit.
- Select Bulk Actions -> Edit.
- Click Apply.
- Reassign the selected products to different Price Groups, assign Licenses, assign to a Collection and add Keywords.
- Click Update.
Shortcodes
Shortcodes are small snippets of code that when added to a Post, Page or Widget add functionality to your site. You must add the following shortcodes to your preferred Pages to use Sell Media:
- Checkout – (REQUIRED) Create a page called “Checkout” and add this shortcode to it:
<code>[sell_media_checkout]</code> - Thanks – (REQUIRED) Create a page called “Thanks” and add this shortcode to it:
<code>[sell_media_thanks]</code> - Search Form – (OPTIONAL) Used to display a search form exclusively for searching items for sale within Sell Media:
<code>[sell_media_searchform]</code> - All Items – (OPTIONAL) Displays all (or a certain collection) items in a grid view:
<code>[sell_media_all_items collection=__abENT__quot;type-your-collection-slug-here__abENT__quot; show=__abENT__quot;type-number-of-items-per-page__abENT__quot;]</code> - List All Collections – (OPTIONAL) Displays all collections in a grid view:
<code>[sell_media_list_all_collections]</code> - Download List – (OPTIONAL) List logged in users downloads:
<code>[sell_media_download_list]</code> - Login – (OPTIONAL) Used to show a custom login form for your customers:
<code>[sell_media_login_form]</code> - Buy Button – (OPTIONAL) Used for displaying specific items for sale:
<code>[sell_media_item id=__abENT__quot;id-of-the-item__abENT__quot;]</code> - Lightbox – (OPTIONAL) Used for displaying images buyers add to their lightbox:
<code>[sell_media_lightbox]</code> - Filters – (OPTIONAL) Used to show a page with Latest, Most Popular, Collections, and Keywords as filters:
<code>[sell_media_filters filters=__abENT__quot;all__abENT__quot;]</code>You can also pass 1, 2, 3, 4 into the filters shortcode parameter to only show specific tabs Latest (1), Most Popular (2), Collections (3), or Keywords (4). For example, if you only wanted to show the Latest and Keywords tabs, you would use this shortcode:<code>[sell_media_filters filters=__abENT__quot;1,4__abENT__quot;]</code>
Widgets
Widgets are optional and can be added to your website on the Appearance -> Widgets page. Sell Media ships with the following widgets:
- Sell Media EXIF – Displays image exif data (shutter speed, aperture, ISO, etc). Only use this on Single Sidebar Widgetized areas.
- Sell Media Featured Items – Displays a grid of featured items thumbnails.
- Sell Media Keywords – Displays a tag cloud of popular keywords on your site.
- Sell Media Recent Items – Displays a grid of recently added items.
- Sell Media Similar Items – Displays a thumbnail grid consisting of similar items to the item currently being viewed.
The Shopping Cart
The shopping cart is displayed only after the <code>[sell_media_checkout]</code> shortcode has been added to a page. You can display various pieces of information currently in your customer’s shopping cart by following these instructions:
Show Cart Quantity In Menu
- Visit the Appearance -> Menu page
- Toggle open the Pages menu box and add your Checkout page to the menu.
- Save the Menu.
Show Cart Total In Menu
- Visit the Appearance -> Menu page
- Toggle open the Pages menu box and add your Checkout page to the menu.
- Toggle open the Screen Options (top right) and make sure that CSS Classes is checked.
- Toggle open the Checkout page menu item that you just added to the menu
- Add a class of “total” in the the CSS Classes field.
- Save the Menu.
Extensions
Extensions add to the functionality of the core Sell Media plugin. They are not required and can be purchased and downloaded directly from the Sell Media Extensions page. Upload an extension just like you would any normal WordPress plugin.
In order to keep your extensions up-to-date, please install and activate GPP Plugin Updates.
Developer API
The following section is for developers and anyone else who wants to customize Sell Media.
Actions
Actions allow you to add html and/or execute code when specific events occur in Sell Media. For example, say you wanted to email Frankie after a successful payment was recorded. You would tap into this action hook:
sell_media_after_successful_payment
The actual action inside Sell Media looks like this:
do_action( 'sell_media_after_successful_payment', $payment_id );
So lets add our own custom action to email Frankie when this action is fired in Sell Media. Your code might look something like this:
How about another example, yeah? Let’s say that you wanted to add a custom message between the product thumbnail and the select options on the cart popup:
Paste that code into either you active theme’s functions.php or better yet, create your own simple “Functionality Plugin” to house your Sell Media plugin customizations. Here is a blank example plugin that you can copy/paste to start adding your own code customizations:
After you add your code to that file, save it, upload it into your WordPress plugins folder and activate it. There are a lot of available actions (also called action hooks) in Sell Media. The best place to find them all is directly in the source code: View all available Actions in Sell Media on GitHub
Filters
Filters can be used to modify text or variables throughout the Sell Media plugin. Unlike Actions, which simply allow us to “do stuff” when something happens in Sell Media, Filters allow us to modify existing text or variables inside Sell Media. How about an example, yeah? Lets say that we wanted to change the text from “Size” on the cart popup to something else. You would use a Filter for that. Your filter might look something like this:
How about another filter example, yeah? Let’s say that you want to change the “Continue Shopping” text and link that appear on the Checkout page:
There are a lot of available Filters in Sell Media. The best place to find them all is directly in the source code: View all available Filters in Sell Media on GitHub
Functions
Display a buy button:
<?php sell_media_item_buy_button( $post_id=null, $attachment_id=null, $button=null, $text=null, $echo=true ); ?>
Display the product thumbnail or icon:
<?php sell_media_item_icon( $post_id=null, $size='medium', $echo=true ); ?>
Display the except of a product:
<?php echo sell_media_get_excerpt( $post_id, $excerpt_length = 140, $trailing_character = ' …' ); ?>
Display a semantic list of Collections assigned to a product:
<?php sell_media_collections( $post_id ); ?>
Display the original, custom price of a product:
<?php echo get_post_meta( $post_id, 'sell_media_price', true ); ?>
Display the Sell Media search form. The $url argument should equal the url to the page containing your [sell_media_searchform] shortcode.
<?php echo Sell_Media()->search->form( $url ); ?>
Classes
The main Sell_Media() class provides access to six additional classes. Each class contain methods, which can be used in your own themes and plugins like this:
<?php echo Sell_Media()->products->get_lowest_price( $post_id=null ); ?>
The get_lowest_price method above will display the lowest price of a product ($post_id). Please note, it is recommended to always check if functions and classes exist before directly calling them. The for some reason the class or function doesn’t exist, it will throw a fatal error. Not good. Here is an example of the same function about that first checks if the Sell_Media class exists:
<?php if ( class_exists( 'Sell_Media' ) ) echo Sell_Media()->products->get_lowest_price( $post_id=null ); ?>
There are hundreds of functions and methods that you can use in your own themes and plugins to extend Sell Media. The classes are heavily documented, so use them as needed:
Theming
Sell Media template files are located in the sell-media/themes folder:
- archive.php
- cart.php
- collection-password.php
You can override these files by copying them into your active theme folder. Then, you can modify these files as needed.
Updates
Updates to Sell Media are handled natively through the core WordPress update notification system. To update extensions for Sell Media, install GPP Plugin Updates to automatically update to the most recent version. Simply add this plugin to your website and then visit the Dashboard -> Updates page to start the update process.
Frequently Asked Questions
Are there any limits to the number of files I can upload and sell?
No. Sell Media and WordPress can easily handle thousands of files. You are only limited by the capacity of your web server.
How are my original, high-resolution images protected?
Sell Media moves the original, high-resolution image to a protected directory on your server. Sell Media then makes lower-resolution copies of the original image and places them the web-accessible uploads directory. The sizes of the lower-resolution images are controlled by your Settings -> Media sizes. Thieves can only steal lower-resolution copies of the image. The original file is always protected.
How do I password protect an item?
The Password Protection option is located in the Publish box when editing a Sell Media item. Click the Visibility – Public – Edit link, select Password Protected, type in a password and click Save.
How do I password protect a collection?
Click Sell Media -> Collections -> Click “Edit” next to the Collection you want to hide, fill in the “Password” click update. Password protected Collections are hidden from being listed on archive pages and homepage of some themes.
Why are the image colors that my customers download different from the image I originally uploaded?
You need to convert your images to sRGB mode before uploading into WordPress. More about color profile conversion degradation in WordPress can be found here.
How do I display a gallery of images for sale?
Sell Media includes a new “Collections” taxonomy, which you can see on the right side of the screen when adding a new item to Sell Media. Assign each item to a specific Collection and the items will be displayed on that specific collection’s archive page. You can then link to the collection like this: http://example.com/collection/my-collection-name/. A list of collecitons also shows up on the Appearance -> Menus page so you can add them to any menu.
How do I increase the maximum upload size in WordPress?
Depending on the web hosting company you choose and the package you select, each of you will see maximum file upload limit on your Media Uploader page in WordPress. For some it is as low as 2MB which is clearly not enough for large images or videos. You can increase this by doing one of the following:
1. Theme Functions File – There are cases where we have seen that just by adding the following code in the theme function’s file, you can increase the upload size:
<code>@ini_set( __abENT__quot;upload_max_size__abENT__quot;,__abENT__quot;64M__abENT__quot; );<br />
@ini_set( __abENT__quot;post_max_size__abENT__quot;, __abENT__quot;64M__abENT__quot;);<br />
@ini_set( __abENT__quot;max_execution_time__abENT__quot;, __abENT__quot;300__abENT__quot; );</code>
2. Create or Edit an existing PHP.INI file – In most cases if you are on a shared host, you will not see a php.ini file in your directory. If you do not see one, then create a file called php.ini and upload it in the root folder. In that file add the following code:
<code>upload_max_filesize = 64M<br />
post_max_size = 64M<br />
max_execution_time = 300</code>
3. htaccess Method – Some people have tried using the htaccess method where by modifying the .htaccess file in the root directory, you can increase the maximum upload size in WordPress. Open or create the .htaccess file in the root folder and add the following code:
<code>php_value upload_max_filesize 64M<br />
php_value post_max_size 64M<br />
php_value max_execution_time 300<br />
php_value max_input_time 300</code>
Again, it is important that we emphasize that if you are on a shared hosting package, these techniques may not work. In that case, you would have to contact your web hosting provider to increase the limit for you.
Transactions are not posting. Why?
Please visit the Add Media -> Settings -> Payments page and double check all of your settings. Also, if you are using PayPal, you need to make sure you have [added your IPN Listener URL to PayPal](https://cms.paypal.com/us/cgi-bin/?cmd=_render-content&content_ID=developer/e_howto_admin_IPNSetup).
Also, PayPal computers use IP ranges 66.211.*.* and 173.0.*.* and visit the IPN URL with NO User-Agent. Some web hosting companies have their servers set up to block incoming pings when the User-Agent is not explicitly set (as is the case with PayPal’s IPN). In this case, you’ll want to modify your .htaccess file to override user-agent blocking with these address ranges.
My Checkout page is empty. Why?
Shopping carts use something called PHP Sessions to save items when buyers add something to their shopping cart. If PHP Sessions aren’t enabled or the PHP setting “session.save_path” is undefined, no sessions will be saved and your checkout page won’t work.
In most cases, this is just a matter of enabling PHP Sessions and making sure that the “session.save_path” setting has a valid server path defined in your server’s main PHP configuration file (php.ini). For example:
session.save_path = /tmp
Talk to your web host and they will be able to fix this for you.
Does the plugin work for a WordPress Network?
Yes it does.
Why are my email receipts not sending?
Some web severs have trouble sending email from WordPress. In that case, we recommend using this email plugin.
Thanks!
Sell Media was created for you for free by Graph Paper Press. Happy publishing!